Battery switch on travel trailer function is crucial for managing your RV’s power. Understanding how to use your battery switch – whether it’s a simple 1-2-both or a more complex system – is key to preventing dead batteries and ensuring your appliances work correctly. This guide breaks down the basics, showing you how to operate your switch safely and efficiently, troubleshoot common problems, and integrate it into your travel trailer’s electrical system.
We’ll cover everything from connecting your batteries to understanding the interaction with your charging system.
This guide will walk you through the different types of switches, best practices for maintenance, and troubleshooting tips to keep your RV’s power flowing smoothly. We’ll also cover safety precautions to ensure you’re working with your batteries and electrical system responsibly.
Understanding Battery Switch Functionality in Travel Trailers
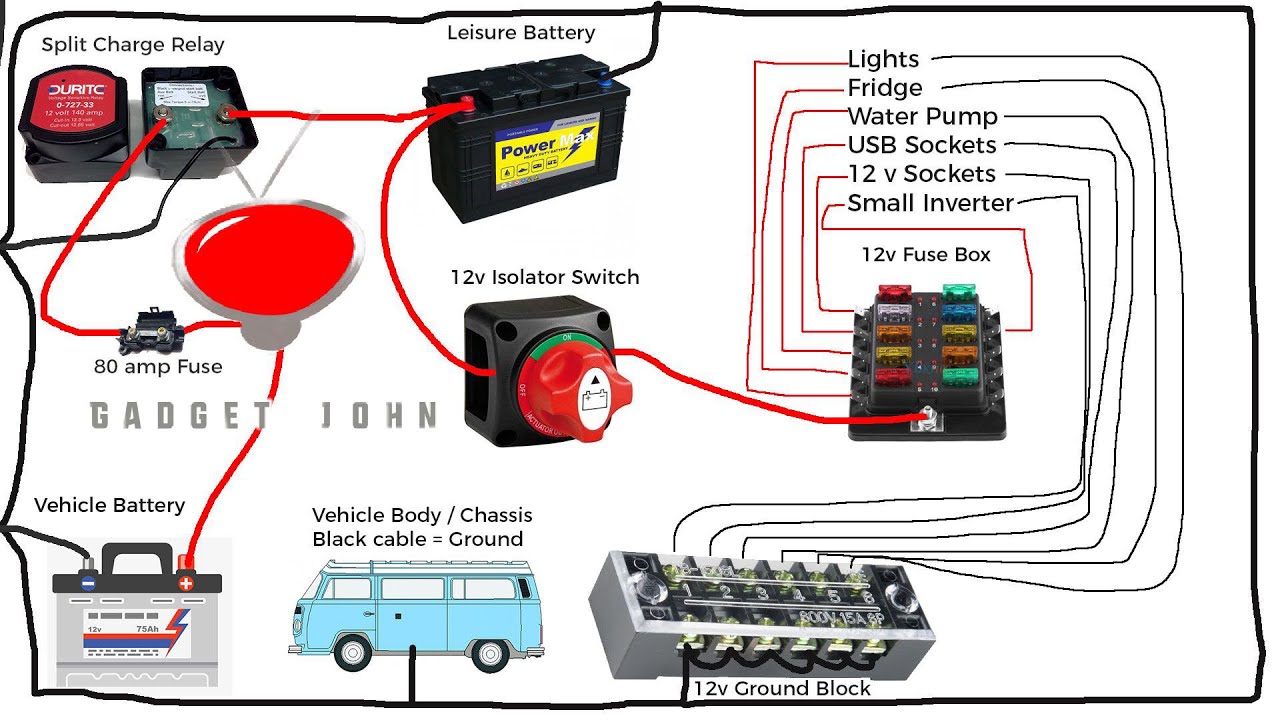
A battery switch is a crucial component in your travel trailer’s electrical system, allowing you to control the flow of power from your batteries to your appliances and accessories. Understanding how it works is essential for safe and efficient use of your RV. Proper use prevents accidental drain of your house batteries and protects your sensitive electronics.
Battery Switch Types
Travel trailers typically use one of two main types of battery switches: a simple on/off switch for each battery, or a more sophisticated switch that allows you to select between different battery banks or combinations. The most common are 1-2-Both switches and 1-2-Off switches. A 1-2-Both switch lets you select either battery 1, battery 2, or both simultaneously.
A 1-2-Off switch allows you to select either battery 1 or battery 2, or to turn both off completely, isolating them from the trailer’s electrical system. Some more advanced systems may incorporate additional positions for charging or connecting to shore power.
Operating a Typical Battery Switch
Operating your battery switch is straightforward, but careful attention to the position is crucial. Before manipulating the switch, familiarize yourself with its markings (1, 2, Both, Off). A typical 1-2-Both switch operates as follows:
1. Off
This position completely disconnects both batteries from the trailer’s electrical system. Use this position for long-term storage to prevent battery drain.
2. 1
This position connects only battery 1 (typically the main house battery) to the trailer’s electrical system.
3. 2
So, you’re an audiophile who loves to travel? Awesome! Check out this guide on creating the perfect audiophile travel setup to ensure your ears are always happy on the go. Don’t forget to sort out your insurance beforehand though; getting Aon travel insurance is a smart move to protect your gear and yourself during your adventures.
Having peace of mind about your valuables lets you fully enjoy those incredible soundscapes wherever you roam.
This position connects only battery 2 (often a starting battery for the tow vehicle) to the trailer’s electrical system.
So, you’re an audiophile who loves to travel? Awesome! Make sure you check out this guide on audiophile travel setups to keep your ears happy on the road. It’s crucial to plan ahead, and don’t forget the practical side of things; getting Aon travel insurance is a smart move to protect your gear and yourself during your adventures.
A little planning goes a long way in ensuring a smooth and enjoyable trip, both musically and logistically!
4. Both
This position connects both battery 1 and battery 2 to the trailer’s electrical system, providing maximum power. Remember that using both batteries simultaneously will deplete them faster.Always ensure the switch is in the correct position before using any appliances or accessories. Improper switching can lead to damage to your equipment or even create a fire hazard.
Comparison of Battery Switch Types
| Feature | 1-2-Both Switch | 1-2-Off Switch | Other Advanced Systems |
|---|---|---|---|
| Power Options | Battery 1, Battery 2, Both | Battery 1, Battery 2, Off | Multiple battery banks, charging circuits, shore power integration |
| Simplicity | High | High | Low |
| Flexibility | Moderate | Moderate | High |
| Cost | Low | Low | High |
| Safety | Good | Excellent (complete isolation possible) | Excellent (with proper setup) |
Connecting and Disconnecting Batteries

Connecting and disconnecting your travel trailer’s house batteries to the battery switch is a straightforward process, but doing it correctly is crucial for both safety and the longevity of your batteries. Understanding the steps involved and practicing safe procedures will help prevent problems and ensure a smooth camping experience.Connecting and disconnecting batteries involves manipulating the battery switch itself, usually a multi-position switch allowing you to select between different power sources (shore power, generator, or batteries).
This switch is the central control point for your house batteries, providing a convenient way to isolate them when needed. Proper connection and disconnection procedures help avoid electrical shorts and ensure your batteries are properly charged and discharged.
Battery Connection Procedure
Before you begin, always visually inspect your battery terminals for corrosion or damage. Clean any corrosion with a wire brush and baking soda solution. To connect your batteries, ensure the switch is in the “off” position. Then, firmly connect the positive (+) cables to the positive terminals and the negative (-) cables to the negative terminals. Double-check all connections to ensure they are secure and tight.
After verifying all connections, move the switch to the “on” or “battery” position.
Battery Disconnection Procedure
To disconnect your batteries, first turn off all appliances and electronics powered by the house batteries. Then, carefully move the battery switch to the “off” position. This isolates the batteries from the rest of the electrical system. After ensuring the switch is in the “off” position, disconnect the negative (-) cables first, followed by the positive (+) cables.
Always disconnect the negative cable first to prevent accidental sparking or short circuits.
Maintaining Battery Connections
Proper battery maintenance is key to preventing corrosion and ensuring reliable power. Regularly inspect your battery terminals for signs of corrosion, which appears as a white, powdery substance. Clean the terminals using a wire brush and a baking soda solution (a paste of baking soda and water is effective). Apply a corrosion inhibitor or dielectric grease to the terminals after cleaning to help prevent future corrosion.
Tighten any loose connections. These simple steps can significantly extend the life of your batteries and prevent unexpected electrical problems.
Safety Precautions When Working with Batteries and the Switch
Working with batteries and electrical systems requires caution. Always wear safety glasses to protect your eyes from potential splashing of corrosive battery acid. Never wear loose clothing or jewelry that could come into contact with the terminals. Ensure the area is well-ventilated to avoid inhaling harmful battery gases. If you are unsure about any step, consult a qualified electrician.
Remember, working with batteries can be hazardous if not handled properly.
Common Problems with Battery Connections and Their Solutions
It’s important to be aware of common issues that can arise with battery connections. Addressing these problems promptly can prevent larger issues.
- Problem: Corrosion on battery terminals. Solution: Clean terminals with a wire brush and baking soda solution, apply dielectric grease.
- Problem: Loose battery connections. Solution: Tighten connections securely.
- Problem: Damaged battery cables. Solution: Replace damaged cables.
- Problem: Battery switch malfunction. Solution: Inspect the switch for damage or replace it if necessary. This often requires professional help.
- Problem: No power to the house batteries. Solution: Check all connections, fuses, and the battery switch itself. Verify that the batteries are charged.
Battery Switch and Charging Systems: Battery Switch On Travel Trailer Function
Your travel trailer’s battery switch plays a crucial role in managing how your batteries are charged, regardless of your power source. Understanding its interaction with your charging system is key to maximizing battery life and avoiding potential problems. This section details how the switch affects charging from shore power, your vehicle’s alternator, and solar panels.The position of your battery switch directly impacts charging efficiency.
With the switch in the “off” position, no charging will occur, regardless of the power source. In the “both” or “combined” position, all batteries are connected and receive charge simultaneously. The “battery 1” or “battery 2” positions allow for charging of individual batteries, useful for troubleshooting or maintaining separate battery banks. However, charging only one battery bank while the other is disconnected can lead to imbalances over time.
Shore Power Charging and the Battery Switch
Shore power, your connection to campground electricity, typically charges through a converter. With the battery switch in the “both” or “combined” position, the converter charges both battery banks simultaneously. If the switch is in the “off” position, charging from shore power is prevented. If in the “battery 1” or “battery 2” position, only the selected bank receives a charge.
Incorrect switch positioning might lead to only one bank being charged, potentially causing premature wear on that battery bank. A fully charged battery bank might also prevent other batteries from receiving a charge if they’re not connected.
Alternator Charging and the Battery Switch
Most travel trailers utilize a charging system that connects to the tow vehicle’s alternator. This system usually charges through a dedicated charging circuit. The battery switch still influences this process. If the switch is “off,” the alternator will not charge the batteries. In the “both” position, both banks are charged; in the “battery 1” or “battery 2” positions, only the selected bank receives a charge from the alternator.
This is crucial for maintaining battery charge during travel. Improper switch usage could mean that your batteries don’t get fully charged while towing, leading to reduced lifespan or even complete battery failure.
Solar Panel Charging and the Battery Switch
Solar panels provide a supplemental charging method. The battery switch’s impact on solar charging is similar to shore power and alternator charging. An “off” position prevents charging. The “both” position allows both banks to be charged simultaneously, while the “battery 1” or “battery 2” positions charge only the selected bank. Incorrect switch positioning will lead to either no charging or only one battery bank receiving charge, which again could result in battery imbalances and reduced lifespan.
Power Flow Flowchart
Imagine a simple flowchart:
1. Power Source
Shore power, alternator, or solar panels.
2. Charging System
Converter (shore power), alternator charging circuit (alternator), charge controller (solar).
3. Battery Switch
The switch acts as a gate, connecting or disconnecting the charging system from one or both battery banks.
4. Battery Banks
Battery 1 and Battery
2. 5. Load
Appliances and lights in the travel trailer.The flowchart would show various paths depending on the battery switch position. For example, if the switch is in the “both” position, the power flows from each source to the charging system, then to both battery banks simultaneously. If the switch is in the “Battery 1” position, the power flows only to Battery 1.
An “off” position would block all power flow to the batteries.
Potential Charging Issues from Incorrect Switch Usage, Battery switch on travel trailer function
Incorrect battery switch usage can cause several issues:* Uneven Battery Charging: Only charging one battery bank while the other is disconnected can lead to significant voltage imbalances and reduced overall battery lifespan.
Premature Battery Failure
Continuously overcharging one battery bank while leaving another uncharged can lead to early failure of the overcharged bank.
Reduced Battery Capacity
Inconsistent charging can reduce the overall usable capacity of your batteries over time.
System Failure
In some cases, an improperly configured switch could lead to a short circuit or other electrical damage.
Troubleshooting Common Battery Switch Problems
Dealing with a malfunctioning battery switch in your travel trailer can be frustrating, but systematic troubleshooting can often pinpoint the issue quickly. Understanding the common problems and how to test the system will save you time and potential headaches. This section will guide you through the process.
Common Battery Switch Problems and Their Causes
Several issues can arise with your battery switch, leading to a lack of power or other problems. These problems often stem from simple issues that can be easily resolved with a bit of investigation. For example, a blown fuse is a frequent culprit, cutting power to the system completely. Corrosion on the terminals, preventing proper electrical contact, is another common problem.
A faulty switch itself, either due to wear or damage, can also cause complete system failure. Finally, incorrect wiring or loose connections can lead to intermittent power or a complete absence of power.
Troubleshooting a Non-Functioning Battery Switch
The first step in troubleshooting is to identify the symptom – are you gettingno* power, or is the power intermittent? A systematic approach is crucial. Begin by visually inspecting the switch and its connections. Look for any obvious signs of damage, corrosion, or loose wiring. Check all fuses associated with the battery switch and the charging system.
A blown fuse will often appear visibly burnt or broken. Replace any blown fuses with fuses of the correct amperage rating. If the problem persists, use a multimeter to test the voltage at various points in the system, starting at the battery and working your way towards the switch and then the load. This will help you isolate the faulty component.
Testing the Battery Switch and Components
A multimeter is your best friend here. With the battery switch off, measure the voltage across the battery terminals. You should get a reading close to the battery’s rated voltage (typically 12V for a 12V system). Next, turn the battery switch to the “on” position. Re-measure the voltage at the output terminals of the switch.
If the voltage is significantly lower or absent, the switch itself is likely faulty. If the voltage is present at the switch output but not at the appliance or device, then the problem lies in the wiring or the device itself. Always disconnect power before working on any electrical components.
Troubleshooting Guide
| Symptom | Potential Cause | Solution | Additional Checks |
|---|---|---|---|
| No power to appliances | Blown fuse | Replace fuse with correct amperage. | Inspect fuse visually for damage. Check fuse holder for corrosion. |
| No power to appliances | Faulty battery switch | Replace battery switch. | Test voltage at switch terminals. |
| Intermittent power | Loose wire connections | Tighten all wire connections. Clean corroded terminals. | Visually inspect all connections for corrosion or looseness. |
| Low power to appliances | Corroded battery terminals | Clean battery terminals with a wire brush and baking soda solution. | Measure voltage at battery terminals and at appliance terminals. |
Battery Switch and Electrical System Integration
Your travel trailer’s battery switch acts as the central control point for your 12-volt DC system, connecting and disconnecting your house batteries from the rest of the trailer’s electrical components. Understanding its integration with the broader electrical system is key to safe and efficient operation. This section details how the switch works within the larger electrical framework, focusing on safety and maintenance.The battery switch is the linchpin connecting your house batteries to the various 12V appliances and systems in your RV.
It allows you to isolate the batteries completely, preventing accidental drain or short circuits when not in use. This is crucial for preserving battery life and preventing damage to other electrical components. The switch works in conjunction with other safety devices, such as fuses and circuit breakers, to maintain a safe and stable electrical environment.
Fuse and Circuit Breaker Protection
Fuses and circuit breakers are essential safety devices designed to protect the wiring and components of your RV’s electrical system, including those connected to the battery switch. Fuses are one-time use devices; when a short circuit or overload occurs, the fuse melts, breaking the circuit and preventing further damage. Circuit breakers, on the other hand, are reusable; they automatically trip when an overload is detected, and can be reset once the problem is resolved.
These devices are strategically placed throughout the system, protecting individual circuits and preventing damage to the battery switch itself. For example, a dedicated fuse might protect the wiring leading from the battery switch to the water pump, while a circuit breaker might protect the entire 12V lighting circuit. Regularly checking fuses and resetting tripped circuit breakers is crucial for maintaining the safety and functionality of your RV’s electrical system.
Adding or Modifying Components
Adding or modifying components connected to your battery switch requires careful planning and execution to maintain safety. Before undertaking any modifications, always disconnect the negative battery cable to prevent accidental short circuits. When adding new components, ensure they are properly fused or protected by a circuit breaker, with the appropriate amperage rating. Wiring should be properly sized for the amperage draw of the new component, using appropriately sized wire connectors and adhering to all relevant electrical codes.
For instance, adding a new 12V refrigerator would necessitate running a new, appropriately sized wire from the battery switch to the refrigerator, complete with its own dedicated fuse or circuit breaker. Improperly adding components can lead to overheating, fires, and damage to your RV’s electrical system. Consult a qualified electrician if you are unsure about any aspect of the process.
Battery Switch Impact on Appliance Functionality
The battery switch directly controls the power supply to many appliances in your travel trailer. When the switch is in the “off” position, all 12V appliances connected to the house batteries are completely de-energized. This includes items like interior lights, water pumps, and some refrigerators. Turning the switch to the “on” position establishes the power flow to these appliances, allowing them to function.
The state of the battery switch, therefore, directly determines the operational status of these devices. For example, if the battery switch is off, attempting to turn on the interior lights will result in no illumination. Understanding this direct relationship is essential for troubleshooting and efficient use of your RV’s electrical systems.
Mastering your travel trailer’s battery switch is a small step with big rewards. By understanding its function, performing regular maintenance, and knowing how to troubleshoot common issues, you’ll ensure reliable power for all your adventures. Remember, safety first! Always disconnect your batteries before working on the electrical system, and if you’re ever unsure, consult a qualified RV technician. Happy travels!
Query Resolution
What happens if I leave my battery switch in the “off” position?
Leaving the switch off completely disconnects your house batteries from the rest of the trailer’s electrical system, preventing any power drain. This is good for long-term storage.
How often should I check my battery connections?
Check your battery connections at least every few months, or more often if you notice any signs of corrosion.
Can I use a different type of battery switch than what came with my trailer?
You can, but ensure the amperage rating is sufficient for your system. Consult an electrician or RV technician if you’re unsure.
My battery switch is hot to the touch. Is this normal?
No, a hot battery switch indicates a problem. Turn it off immediately and check for loose connections or a short circuit. Consult a professional.
